Sound or digital audio is one of the most significant elements of multimedia. It plays an extremely powerful part in enhancing the mood, feel and effectiveness of a multimedia presentation. It should also be noted that poor use of sound could also have an equally negative influence on the experience of a presentation.
Audio enriches the multimedia experience with background music, voiceover and sound effects. Music sets the ambiance or feel of the program. Voiceover or speech provides us with an alternative and more effective way to present or deliver instruction and information. Sound effects enhance the program by adding variety and life to something that would otherwise be only an interactive visual experience.
Before we get into the nitty-gritty of what the different components and qualities of sound we need to get our heads around the difference between analog and digital sound.
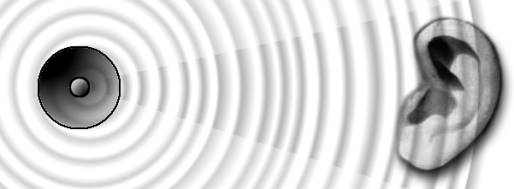
We basically live in an analogue world. The sounds that we hear are made up of waves that travel through the air, similar to the concentric circular waves on a lake when a stone is tossed in, except sound travels in a 3 dimensional concentric circles rather than a 2 dimensional wave on the water surface. Sound waves travel at a speed of about 1200KpH.
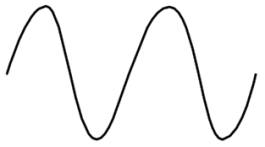
In order for us to be able to visualize the aspects of a sound wave we are best to look at it as a 2 dimensional cross-section.
Diagram 2:
If we looked closely and zoomed into a section of a sound wave an analog sound would look different to a digital one.
Diagram 3:
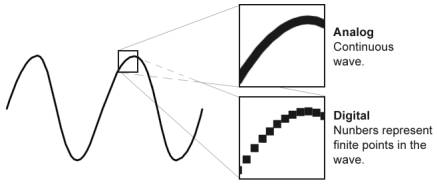
As illustrated in diagram 3, analog sound is a continuous variation in air pressure or in terms of recorded sound a continuous electrical varying wave, whereas digital sound is a whole series of numbers representing different points in time and is therefore not continuous but stepped.
Sound waves are made up of 2 major components, which are displayed in the wave cross-section model. They are Frequency and Amplitude.
The Frequency is the tone of the sound or note that we hear. The higher the frequency the higher the note. E.g. A bass-guitar plays low frequency notes whereas a violin plays high frequency notes.
Diagram 4:

Hertz (Hz) and Kilohertz (kHz):
Frequency is measured in pulses or waves per second. The component for this is called Hertz, (Hz) 20 Hz = 20 pulses per second.
The average person has a hearing range between about 20Hz to about 20 kHz.
(Pronounced Kilohertz: 1 kHz = 1,000 Hz)
The Volume or loudness of sound is what we call the Amplitude. The amplitude of a sound wave is the distance between the peak and the base line.
Diagram 5:

Decibels: (dB):
The amplitude of sound is measured in Decibels. (dB)
The following list will give you an idea of what the units of decibels are:
Recording studio 20dB
Very soft whisper 30dB
Voice in conversation 70dB
Shouting voice or subway train 90dB
75 piece orchestra at fortissimo (Very loud) 130dB
As you can see a decibel is a very small unit. (20dB is what most people would call silence)
Capturing Sound.
Sound is caused by some sort of movement which, in turn, causes a chain reaction of movement or vibrations in the air as tiny spherical waves that travel through the atmosphere. When these vibrations reach our ear they cause a vibration to the sensitive area of our eardrum. The ear then converts the sound waves into electrical signals, which are then sent to the brain. The brain in turn interprets the electrical signal into its perception of what the sound is.
A similar sequence of events happens when we use a microphone to record sound and capture it on a computer with a sound card installed. Lets’ say for example someone records their voice:
1. They speak, which is the production of sound through movement of the oesophagus and the expelling of air. The sound waves travel through the air and hits the diaphragm of the microphone which in turn vibrates and creates electrical currents that consist of waves which are identical to the wave of the sound itself. This electrical current is still in analog form.
2. When it reaches the computer it needs to be converted into digital form meaning changing it from a continuous wave to a lot of numbers that represent exactly what the sound wave is. This operation is performed by a special chip on the sound card called an ADC. (Analog to Digital Converter)
Diagram 6:
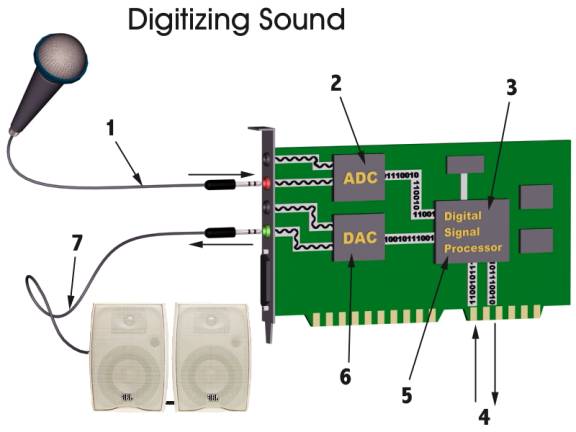
3. The digital signal is then sent to another chip called a DSP (Digital Signal Processor) which is an isolated processor designed to take the task of compressing the sound files away from the computers main processor. It then sends the signals off to the CPU (Central Processing Unit) to be saved to file on disc.
4. Once saved the digital audio can be edited and manipulated with digital audio editing software like Sonic Foundry’s’ Sound Forge and then played back.
5. When the sound is played back, either from within the editing software or on of many digital audio playback applications, the CPU collects the compressed digital audio from storage on disc and sends it to the DSP on the sound card. The DSP then de-compresses the audio on the fly and sends it to the DAC.
6. The DAC (Digital to analog converter) converts the digits into an electrical analog audio signal, which is in turn sent out to the speakers, headphones or recording playback device like a stereo player.
7. Finally the speakers respond to the analog electrical signal by moving and pumping the air to produce the sound wave version of the electrical signal it is receiving.
Why Convert to Digital?
When a sound is in digital form it is made up of thousands and millions of numbers. (1s’ and 0s’ or binary code) This means that we can use software to apply all sorts of mathematical equations known as algorithms to manipulate and edit the sounds with the greatest of ease and without the need of expensive multi-track and special effects equipment. It also means that we can copy digital audio as often as we like without losing any quality whatsoever.
Is the Quality of digital audio as good as analog?
Some people still argue that vinyl records produce a better sound than CDs do. Most people can’t tell the difference. Technically speaking, digital audio at CD quality happily plays all sounds within our hearing range.
The quality of digital audio can vary depending on 3 quality factors:
· Sample Rate
· Sample Size. (Bit Depth)
· Number of channels (Stereo/Mono)
All three of these are directly related to the file size of the digital audio and therefore also related to its ability to play back smoothly, especially over the Internet.
In order to be able to maximize the performance of your digital sound it is important to understand what these 3 quality factors are.
Sample Rate.
Due to the fact that digital audio is made up of numbers we need to determine what number represents the sound wave at a particular time. This is called a “sample”.
Every time a sample is taken, a number is allocated to that point in time. Therefore, the more samples you take in a second of time, the greater chance you have of capturing every little beat note or intonation in the sound wave.
Have a look at Diagram 7 and notice the difference between the 3 examples on the right. Each sample is simply a measurement of the amplitude of the wave at the particular instant in time. The diagram illustrates that the greater the sample rate, the closer we will get to the accuracy of the original wave.
Diagram 7:
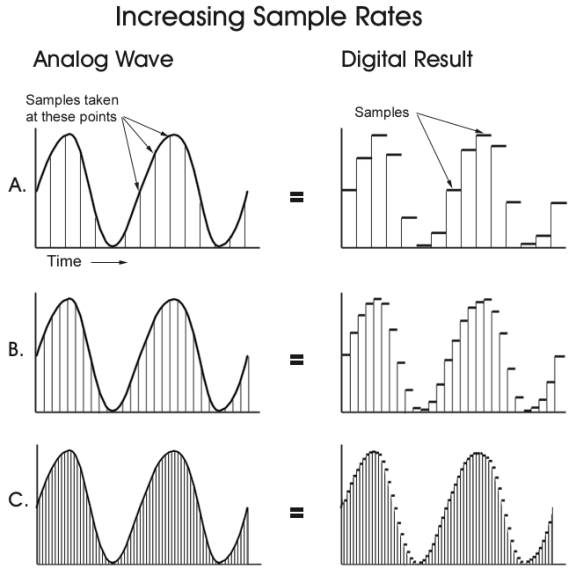
The Sample rate of sound is measured in Hz or cycles per second, similar to frequency, but not the same thing.
Sample rates are most commonly one of the following values:
11.025 kHz (11,025 samples per second)
22.05 kHz (22,050 samples per second)
44.1 kHz (44,100 samples per second)
CD Audio is sampled at a rate of 44.1 kHz, which is 44,100 times per second. This sample rate is high enough to pick up any frequency that is audible to the human ear.
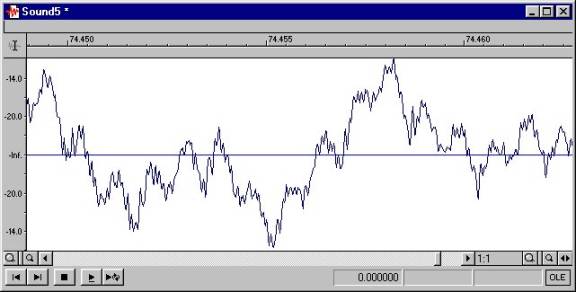
Note: These wave examples have been simplified into simple sine curves. Real sound waves are usually a lot more erratic. (See Diagram 8) Therefore lower sample rates would miss out on all the peaks and troughs in between each sample.
Diagram 8
Nyquist Factor.
A sample rate needs to be at least double the audio frequency in which to capture it. Therefore it can capture the peak as well as the trough of the wave during each cycle. Thus any sound frequency which is greater than half of the sample rate will not be captured. This is called the Nyquist Factor.
CD audio is sampled at a rate of 44.1 kHz therefore the highest audio frequency that can be captured is 22.05 kHz. As stated earlier, the maximum human hearing range is about 20 kHz and so consequently CD quality audio is capable of playing any sound frequency within the human hearing capacity.
Here are some examples of different sound qualities and the relative Sample rates and the highest recorded sound frequency
Sample Rate: |
Highest recorded frequency: |
Media type: |
44.1 kHz |
22.05 kHz |
Compact Disc (CD) |
22.05 kHz |
11.025 kHz |
FM radio |
11.025 kHz |
5.51 kHz |
AM radio |
.
Sample Size. (Bit Depth)
Sometimes also called “Resolution”, the second digital audio concern is the Bit Depth or Sample size. This is similar to the bit depth of digital images. It is simply the amount of choices we have, per sample, to represent the particular frequency (Tone) being sampled.
Most sound cards these days are capable of 16 bit capture but we need to take bit depth into account if we want to optimize file sizes in which to get our multimedia presentation running smoothly.
If the sound file is 8 bit, this means we have 265 choices to represent that particular frequency (2⁸ = 256) and if the sound is 16 bit we have a choice of 65,536 frequencies.
(2¹⁶ = 65,536) The difference between 8 bit and 16 bit is an extra 255 tones between each 8 bit tone. The binary number for an 8 bit tone has 8 digits whereas a 16 bit tone has 16 digits.
The dynamic range of a sound is the difference in decibels between the highest and lowest readable frequency.
The dynamic range of an 8 bit sound is 48 dB and that of a 16 bit sound is 96 dB. The dynamic range capacity of the human ear is 98 dB
The difference in file size of a 16 bit sound wave is double that of an 8 bit sound.
Number of channels. (Stereo/Mono)
Most people are familiar with the word stereo. We buy a “stereo” for the car meaning a stereo sound system and we listen to FM Stereo music. We know that stereo systems have at least 2 speakers but what does stereo really mean? I often encounter people who assume that stereo is some sort of highly technical process that makes the sound more atmospheric. Well it does do that but the process is quite simple. Stereo music is made up of 2 separate recordings, a left channel and a right channel. The sound recordist can distribute the different parts of the music between the 2 channels at their discretion. Usually a sound studio has the ability to record to about 18 separate tracks. One track might be the drums, another track the guitar, another the voice etc. So therefore the recording artist can put different elements of the music into the left and right channel. This gives the listener a more realistic experience of the music because is sounds like the instruments etc are in different positions in the room. Hence it is important to position your stereo speakers well apart to obtain the full stereo effect. Stereo recordings tend to be more realistic and true to life because we have 2 ears
Mono music on the other hand has only the 1 channel and is a single recording. Mono sound would be used when there is no point in using stereo, like a voice-over, sound effects or quiet background music.
Stereo music is twice the file size of mono so it is worth considering whether stereo is necessary.
So what Sample rate, Sample size and Number of channels do I choose?
All three quality factors are directly related to the file size of digital audio. It all depends on what sort of quality is needed or desired for the particular purpose. If you can sacrifice some audio quality where it won’t be noticed it is worth doing so if it will help your program run more smoothly and efficiently.
The following table will give you an idea of what quality levels are obtained with each combination of the three standards we have discussed and their relationship to file size:
Sample Rate: |
Sample Size: |
Stereo/Mono: |
File size for 1 Minute: |
Quality: |
48 kHz |
16 bit |
Stereo |
11.4 Mb |
DAT Professional High quality |
44.1 kHz |
16 bit |
Stereo |
10.5 Mb |
CD Standard audio Quality |
22.05 kHz |
16 bit |
Stereo |
5.25 Mb |
FM Radio |
22.05 kHz |
16 bit |
Mono |
2.5 Mb |
Multimedia Presentation |
11.025 kHz |
8 bit |
Mono |
650K |
AM Radio |
5.51 kHz |
8 bit |
Mono |
325K |
Telephone |
Digital Audio Types.
Because of the fact that digital audio (and multimedia) is still a relatively new technology there are many different formats around that were created for different platforms and also as new technology emerges new formats arise as a result.
Different sound formats in the PC world are recognized by their file extensions. (The 3 characters on the end of a file name after the dot)
File Extension: Name Producer:
*.wav Wave File Microsoft
*.aif (or* .aiff or* aifc) Audio Interchange File Format Apple, SGI
*.au or *.snd Audio or sound NeXt, Sun
*.mp3 Mpeg layer III MPEG
*.vqf Vector Quantization Yamaha Sound
*.asf Advanced Streaming format Microsoft
*.ra Streaming audio Real Audio
*.rmf Rich Music format Beatnik
*.sds Midi file Midi SDS
*.mp2 Mpeg layer II MPEG
*.sfr Sample Resource Sonic Foundry
*.smp Samplevision format Turtle Beach
*.dig Sound Designer I audio Atari
*.iff, Interchange file format Amiga
*.smp Sample File Ad Lib Gold
*.svx Interchange file format, 8SVX/16SV Amiga
*.voc Audio file Sound Blaster
*.vox audio file coded using ADPCM Dialogic
*.v8 8-bit audio file Covox
*.pat Patch file Gravis
*.mod or *.nst Noise Tracker Amiga
(* means the given name of the file goes here)
As you can see there are many different types of sound files. (I have not listed them all here) Some file types have very specific purposes, some are old technology and some are new emerging technologies.
So which type do I choose?
If you are developing multimedia for CD-ROM or the Internet it is best to stick with the most common sound formats to ensure that the users computer has the correct software and drivers to play back your sounds.
The most common sound files at present are Microsoft Wave Files (.wav) for Windows and Apple Audio Interchange File Format (.aif) for the Macintosh.
The WAV files have in the past only been Windows or IBM compatible but now the recent Macintosh operating systems can now also play wave files.
AIF sounds can be played on both Macintosh and Windows platforms.
These 2 formats both provide the highest quality for editing, stereo/mono and support a wide variety of the standard sample rates and bit depths. Therefore if you are capturing analog sound it is best to save as WAV on the PC or AIF on the Macintosh. If you need to, for a specific purpose, you can always convert the sound files, at a later date, into another format using sound editing software such as Sonic Foundry Sound Forge.
Sound Compression.
Sound files can be quite large, especially for Internet distribution and slower systems. To combat this developers from all over the world, working on different platforms and with different file types have endeavored to find ways to compress sound files, similar to the way they compress video, images and other files.
There are many “Codecs” (Compressor/De-compressors) available for sound that have been developed over the years of digital audio development. These are algorithms (Mathematical equation codes) designed to make the file size of sounds smaller and therefore easier to transport, playback and store. These codecs can be found in the “Save as “ dialog box of your audio editing software under “Format”.
Some of the more common audio codecs are:
PCM, (Pulse Code Modulation) ADPCM, (Adaptive Differential Pulse Code Modulation) CCITT A Law, CCITT U Law, MSN Audio, MACE, GSM 610.
Most of the audio codecs, however, conspicuously deteriorate the quality of the sound. So if quality is an issue they are generally to be avoided. Also, with the recent advent of MP3 technology, most other audio codecs will be superceded.
What is MP3?
MP3 (MPEG Audio layer 3) is an audio compression algorithm developed by Motion Picture Experts Group (MPEG) who developed the digital video compression format (MPEG2) used in DVD video. This compression format gives remarkable compression rates for hardly any noticeable quality loss. MP3 can compress a sound down by a factor of 10 to 14. An average 3 minute CD quality song (44.1 kHz, 16 bit, Stereo) is about 32 Mb in size. If you convert that song into MP3 format it will be about 3 Mb in size. This is especially popular on the Internet because it lets you download a song in minutes rather than hours and also it allows you to store hundreds of songs on your hard drive without clogging it up too much.
MP3 technology has taken the world by storm because all of a sudden people have the ability to exchange songs over the Internet with the greatest of ease. This has become a nightmare for recording companies, musicians and copyright legislators. There is a great deal of debate about how to or even if they can control copyright piracy over the Internet.
For multimedia developers it means that we can maintain high quality audio in our presentations with minimal file size problems. Many multimedia authoring tools such as Macromedia Director 7 and Flash 4 have adopted MP3 technology.
There are many free MP3 players available to download from the internet. One of the most popular is Winamp, (diagram 8) which is available at www.winamp.com.
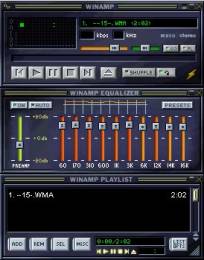
There are also many other players available which include different features and levels of sound control. Most will also play WAV files, CD Audio and a variety of audio formats..
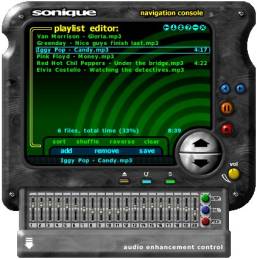
Others include the Sonique player from www.sonique.com.
VQF is a similar technology to MP3, which deserves mention as it claims to be more efficient and even smaller in file size. Unfortunately is hasn’t gained the popularity of its rival.
Streaming Audio.
Most of the audio files we have looked at so far are non-streaming. This means you have to completely download it onto your hard drive before you can play it. Streaming audio however, doesn’t need to wait for the whole file to download and lets you start listening to the sound as soon as it starts downloading. Obviously the faster your connection is the smoother the streaming audio will be. If the connection is slow then the streaming audio may hiccup or stop occasionally while it waits for the next bit to arrive.
Probably the most common form of streaming audio is Real™ Audio. This format uses the Real Audio Player and its file extension is *.ra, *.rm or *.ram.
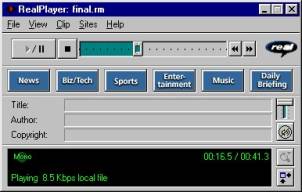
The player for Real Audio is free and available for download from www.real.com.
Real Player allows you to listen to streaming audio directly from web pages like, for example, a record store might have samples of songs that you can listen to almost immediately so you could decide if you wanted to buy the CD or not.
The first thing to note is that M.I.D.I. isn't a sound file format. It doesn't carry the same sort of information as a .WAV or .AIFF file for instance. You can’t actually record your voice, for example to MIDI.
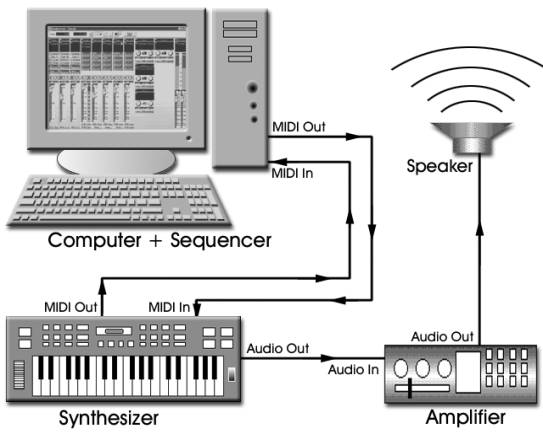
Midi technology was developed in the early 1980s as a way for musicians to get a group of connected electronic synthesizers to tell each other to play an array of different sounds all from the one keyboard. Due to the fact that that MIDI is a binary (Digital) technology, it was bound to end up in the computer where the sounds can be manipulated and re-coded in many wonderful ways. As the name suggests (Musical Instrument Digital Interface) MIDI is uses samples of sounds from different instruments, some real and some synthetic, and applies them to the notes of a synthesizer keyboard or a MIDI recording.
A MIDI file contains information on what notes where played, in what order and timing and what instruments are applied to the notes. MIDI files contain 16 stereo tracks, with a general choice of 128 instruments. Therefore you can have 16 separate instruments or rhythms playing out of a choice of 128 instruments. The following table is a list of the standard 128 MIDI sounds.
ID No. |
Instrument |
ID No. |
Instrument |
ID No |
Instrument |
1 |
Grand Piano |
44 |
Contrabass |
87 |
Lead 7 (Fifths) |
2 |
Bright Acoustic Piano |
45 |
Temelo Strings |
88 |
Lead 8 (Bass & Lead) |
3 |
Electric Grand Piano |
46 |
Pizzicato Strings |
89 |
Pad 1 (New Age) |
4 |
Honky Tonk Piano |
47 |
Orchestral Harp |
90 |
Pad 2 (Warm) |
5 |
Electric Piano 1 |
48 |
Timpani |
91 |
Pad 3 (Polysynth) |
6 |
Electric Piano 2 |
49 |
String Ensemble 1 |
92 |
Pad 4 (Choir) |
7 |
Harpsichord |
50 |
String Ensemble 2 |
93 |
Pad 5 (Bowed) |
8 |
Clavi |
51 |
Synth Strings 1 |
94 |
Pad 6 (Metallic) |
9 |
Celesta |
52 |
Synth Strings 2 |
95 |
Pad 7 (Halo) |
10 |
Glockenspiel |
53 |
Choir Aahs |
96 |
Pad 8 (Sweep) |
11 |
Music Box |
54 |
Choir Oohs |
97 |
FX 1 (Rain) |
12 |
Vibraphone |
55 |
Synth Voice |
98 |
FX 2 (Soundtrack) |
13 |
Marimba |
56 |
Orchestral Hit |
99 |
FX 3 (Crystal) |
14 |
Xylophone |
57 |
Trumpet |
100 |
FX 4 (Atmosphere) |
15 |
Tubular Bells |
58 |
Trombone |
101 |
FX 5 (Brightness) |
16 |
Dulcimer |
59 |
Tuba |
102 |
FX 6 (Goblins) |
17 |
Drawbar Organ |
60 |
Muted Trumpet |
103 |
FX 7 (Echoes) |
18 |
Percussive Organ |
61 |
French Horn |
104 |
FX 8 (Sci-Fi) |
19 |
Rock Organ |
62 |
Brass Section |
105 |
Sitar |
20 |
Church Organ |
63 |
Synth Brass 1 |
106 |
Banjo |
21 |
Reed Organ |
64 |
Synth Brass 2 |
107 |
Shamisen |
22 |
Accordion |
65 |
Soprano Sax |
108 |
Koto |
23 |
Harmonica |
66 |
Alto Sax |
109 |
Kalimba |
24 |
Tango Accordion |
67 |
Tenor Sax |
110 |
Bagpipe |
25 |
Acoustic Guitar (Nylon) |
68 |
Baritone Sax |
111 |
Fiddle |
26 |
Acoustic Guitar (Steel) |
69 |
Oboe |
112 |
Shanai |
27 |
Electric Guitar (Jazz) |
70 |
English Horn |
113 |
Tinkle Bell |
28 |
Electric Guitar (Clean) |
71 |
Bassoon |
114 |
Agogo |
29 |
Electric Guitar (Muted) |
72 |
Clarinet |
115 |
Steel Drums |
30 |
Overdriven Guitar |
73 |
Piccolo |
116 |
Woodblock |
31 |
Distortion Guitar |
74 |
Flute |
117 |
Taiko Drum |
32 |
Guitar Harmonics |
75 |
Recorder |
118 |
Melodic Tom |
33 |
Acoustic Bass |
76 |
Pan Flute |
119 |
Synth Drum |
34 |
Electric Bass (Finger) |
77 |
Blown Bottle |
120 |
Reverse Cymbal |
35 |
Electric Bass (Pick) |
78 |
Shakuhachi |
121 |
Guitar Fret Noise |
36 |
Fretless Bass |
79 |
Whistle |
122 |
Breath Noise |
37 |
Slap Bass 1 |
80 |
Ocarina |
123 |
Seashore |
38 |
Slap Bass 2 |
81 |
Lead 1 (Square |
124 |
Bird Tweet |
39 |
Synth Bass 1 |
82 |
Lead 2 (Sawtooth |
125 |
Telephone Ring |
40 |
Synth Bass 2 |
83 |
Lead 3 (Calliope) |
126 |
Helicopter |
41 |
Violin |
84 |
Lead 4 (Chiff) |
127 |
Applause |
42 |
Voila |
85 |
Lead 5 (Charang) |
128 |
Gunshot |
43 |
Cello |
86 |
Lead 6 (Voice) |
Channel 10 is reserved for percussion sounds of which the following sounds are designated to 46 specific keys on the synthesizer keyboard. With this the techno-musician can create a wide variety of rhythms from the keyboard.
Note No. |
Note Name |
Sound |
Note No. |
Note Name |
Sound |
35 |
B1 |
Acoustic Bass Drum |
59 |
B3 |
Ride Cymbal 2 |
36 |
C1 |
Bass Drum 1 |
60 |
C3 |
High Bongo |
37 |
C#1 |
Side Stick |
61 |
C#3 |
Low Bongo |
38 |
D1 |
Acoustic Snare |
62 |
D3 |
Mute Hi Conga |
39 |
D#1 |
Hand Clap |
63 |
D#3 |
Open Hi Conga |
40 |
E1 |
Electric Snare |
64 |
E3 |
Low Conga |
41 |
F1 |
Low Floor Tom |
65 |
F3 |
Hi Timbale |
42 |
F#1 |
Closed Hi-Hat |
66 |
F#3 |
Low Timbale |
43 |
G1 |
High Floor Tom |
67 |
G3 |
High Agogo |
44 |
G#1 |
Pedal Hi-Hat |
68 |
G#3 |
Low Agogo 2 |
45 |
A2 |
Low Tom |
69 |
A4 |
Cabasa |
46 |
A#2 |
Open Hi-Hat |
70 |
A#4 |
Maracas |
47 |
B2 |
Low Mid-Tom |
71 |
B4 |
Short Whistle |
48 |
C2 |
High Mid-Tom |
72 |
C4 |
Long Whistle |
49 |
C#2 |
Crash Cymbal 1 |
73 |
C#4 |
Short Guiro |
50 |
D2 |
High Tom |
74 |
D4 |
Long Guiro |
51 |
D#2 |
Ride Cymbal 1 |
75 |
D#4 |
Claves |
52 |
E2 |
China Cymbal |
76 |
E4 |
High Woodblock |
53 |
F2 |
Ride Bell |
77 |
F4 |
Low Woodblock |
54 |
F#2 |
Tambourine |
78 |
F#4 |
Mute Cuica |
55 |
G2 |
Splash Cymbal |
79 |
G4 |
Open Cuica |
56 |
G#2 |
Cowbell |
80 |
G#4 |
Mute Triangle |
57 |
A3 |
Crash Cymbal 2 |
81 |
A5 |
Open Traingle |
58 |
A#3 |
Vibraslap |
If you don’t own a MIDI Synthesizer you can still use the computer keyboard, but musicians would generally find this to be a handicap.
MIDI Musicians use special type of software called a Sequencer to manipulate, move and organize their arrangements. This image is the console interface of a popular Sequencer called Cakewalk.
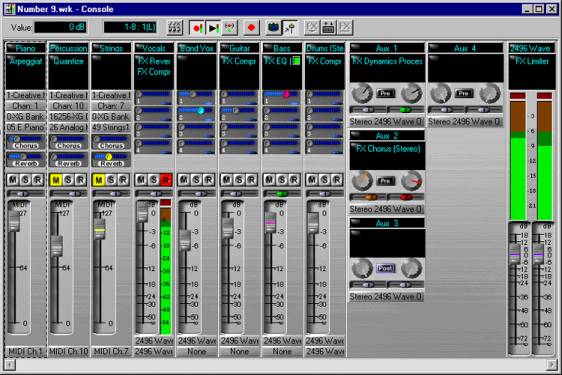
When the sequencing and editing is completed the midi file can be saved and played back on any computer with MIDI capabilities, which most sound cards these days have. MIDI files carry the *.sds extension.
Beatnik RMF.
Another new and exiting audio technology to arrive on the scene is the RMF (Rich Music Format) developed by Beatnik as a cross platform audio format for the Internet. RMF uses a similar technology to MIDI, which can source many sounds as samples and uses algorithms to convert the sounds into different notes and even instruments. To enjoy Beatnik sound you need to install the Beatnik plug-in. This is a browser plug-in that allows interactive audio and streaming audio directly from your web page. This plug-in will play RMF, MIDI, WAV, AIF, U-Law and MOD sound types.

This means background music and multiple interactive rollover sounds on HTML web pages, which can easily be authored in programs like Macromedia Dreamweaver. A good example of this can be experienced at www.sonicopia.com.
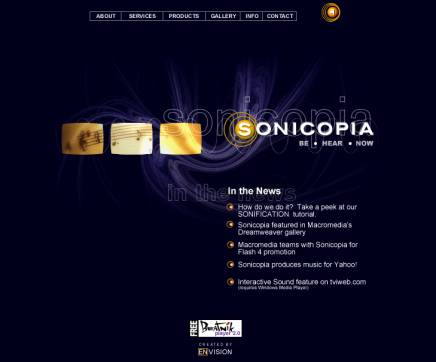
If you have the Beatnik browser plug-in installed on your computer you can enjoy the well-engineered musicality of this site. All the button rollovers have different sound, all of which are in tune with the background music.
The Beatnik plug-in is free to download from www.beatnik.com or from the link placed on sites like this one.
![]()
Other interesting examples of this technology can be found in the Showcase section of the Beatnik site. Here users can engineer their own mix of popular songs.
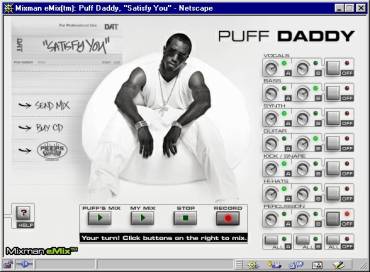
Another impressive innovation found in their showcase is an online MIDI style sequencer made with Macromedia Flash using Beatniks RMF technology.
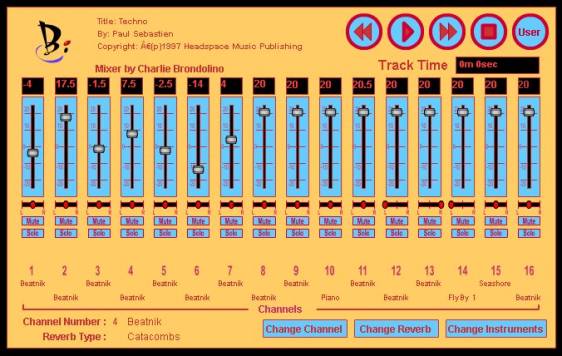
In this complex presentation the user can manipulate the mix of musical sounds and rhythms altering things like the type of reverberation and even instrument type.
The world of digital sound is becoming progressively more sophisticated every day. Not only are the software capabilities increasing but also sound cards, amplifiers, microphones and speakers are obtaining new heights in obtaining crystal clear sound. Sound technology is a specialist area of its own right but it is quite accessible to the multimedia developer to support and give life to their presentations.
Sound Card.
Most Windows and Macintosh computers these days come with a sound card capable of handling at least CD Quality audio (44.1 kHz, 16 bit, Stereo) a multiple of other qualities and MIDI capabilities. Most sound cards easily reach the capabilities required for multimedia development, however if your choose to specialize in quality sound production you would probably be best advised to look into invest in a quality card.
Probably the most important consideration in sound recording is the quality of the analog input device. (Microphone, tape deck, amplifier) If you record from poor quality equipment your resulting sound will be accordingly mediocre. Therefore it is worthwhile getting your hands on the best equipment available to you. Studio quality recording equipment can be extremely expensive. Microphones alone can range in price from a $25 voice/PA mike to around $4,000 for a professional studio mike.
Microphones.
There are many different types of microphones designed for a wide variety of specific purposes. Some are designed to pick up specific frequencies and not others, some may be really good for soprano, for example, but not baritone.
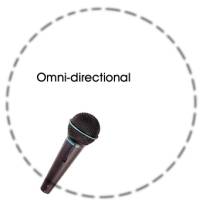
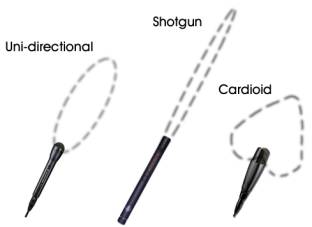
Most Microphones are categorized into 3 types with respect to the directional capabilities. They are:
· Omni-directional
· Uni-directional
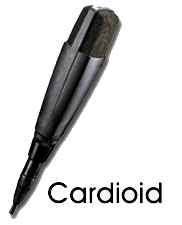
· Cardioid
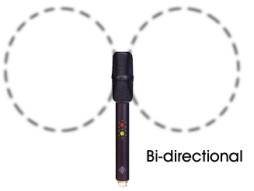
· Bi-directional.
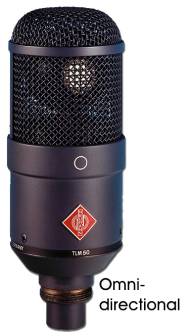


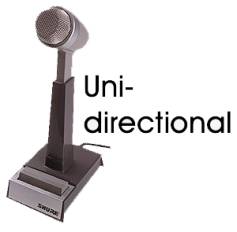
Omni-directional microphones pick up sounds from all directions. You don’t have to be in front of this microphone to be picked up. These are good for picking up everything in the area like , for example a video conference where all members need to be heard. Lapel microphones are omni-directional so that the speaker can look straight ahead and talk and still be picked up by the mike.
Bi-directional microphones pick up sound from 2 directions only and exclude peripheral noise from either side. These mikes are often used in interview situations where a single stationary microphone is used. Bi-directional microphones can also be stereo, which captures each side into each channel.
In the following exercises you will learn how to:
· Record a sound (Your voice) onto the computer.
· Re-sample a sound wave.
· Join 2 sounds together.
· Mix (Overlay) 2 sounds.
· Use digital Effects.
· Create a sound loop.
· Convert audio formats to other formats.
· Use digital editing techniques to filter out unwanted hiss.
In which to record from and external device such as a microphone or stereo system we need to plug our external devices into the appropriate sockets. PC sound cards generally have 4 connection sockets: a line in, Microphone in, speaker out and line out using 3.5mm stereo mini jack connectors. They also have a 15 pin MIDI adapter/Joystick connector.
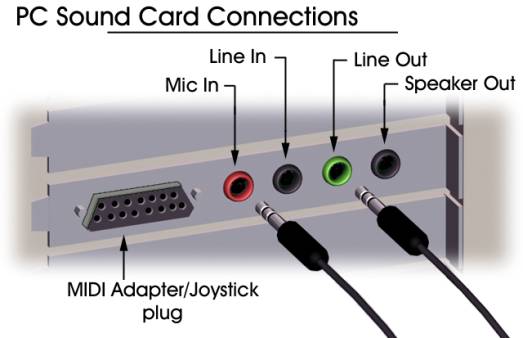
· Microphone In: Plug your microphone in here. (If you don’t have the right sort of connector jack adapters are readily available from electronics stores.
· Line In: This socket is used for plugging in amplified sources such as a Hi Fi system or amplifier. (This socket can be used for recording and playback for powered rear speakers)
· Line Out: For playback to amplified sources such as a tape deck for recording or Hi Fi for high quality amplified playback.
· Speaker Out: Connects speakers for audio output from the cards built in power amplifier.
· MIDI Adapter/Joystick: Connect MIDI device (Synthesizer Keyboard) and joystick for games.
Macintosh connections to go here.
1. Connect your microphone to the Microphone In socket.
2. Open Sound Forge XP 4.5 (Start > Programs > Sonic Foundry Sound Forge XP > Sound Forge XP 4.5 or double click the Sound Forge Icon on the Desktop)

3. From the menu bar select File > New (Ctrl + N) and when the New window Properties dialog box appears enter the following Quality Values:
Sample Rate: 44,100 Hz
Sample Size: 16 bit
Channels: Mono
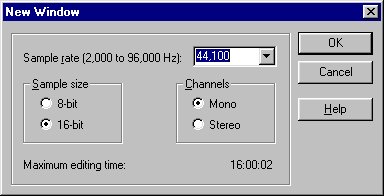
…Then click OK.
4. Now click on the Record Button.![]() This launches the Record window.
This launches the Record window.
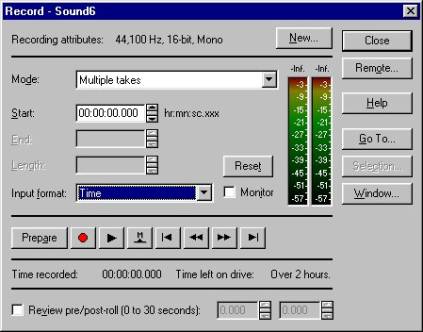
5. Make sure the Input Format is set to Time.
6. Check the Monitor Checkbox (This allows you to view the input levels while preparing to record)
7. Open your Windows Volume controls. (Right click on the speaker Icon![]() on the windows Task bar and select Open Volume Controls) Then from the Options menu, select Properties, click the Recording radio button and then check the checkbox beside Microphone in the list.
on the windows Task bar and select Open Volume Controls) Then from the Options menu, select Properties, click the Recording radio button and then check the checkbox beside Microphone in the list.
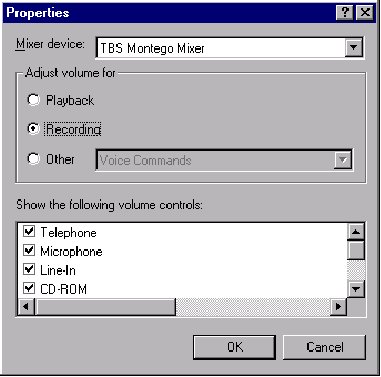
Click OK and then you will see the recording volume controls. Make sure the microphone channel is not muted and is selected and active.
8. Now you can test your recording volume by speaking into the microphone while adjusting the microphone volume slider and watching the levels in the Sound Forge Recording window. Adjust it so that the meter almost gets into the red area at the top. This way you get the highest level of recording without distortion.
Note: When doing this practice saying “Testing one-two”. There’s a reason the technicians at gigs say this when testing mike volumes and it is that saying “T” is the sound that explodes into the microphone the most. So you need to set it to a level where “Two” doesn’t make the meters hit the red area.
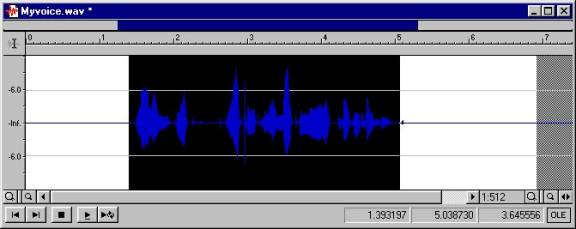
9. Practice what you are about to record. “Hello, I’m Your Name, Welcome to my multimedia presentation”. When you are ready click the Record button, ![]() say your bit and then click the stop button.
say your bit and then click the stop button. ![]()
10. You will notice the graphic of your waveform in the window in the background. Close the Record window by clicking on the Close button.
11. Now you can play back your recording by clicking on the Play button. ![]()
12. If you’re unhappy with your recording repeat the previous steps.
13. When you have a good recording the next step is to crop away the unwanted bits of silence and any unwanted “ums”.
Play the sound wave and watch the needle move across it to identify the part that you want to keep. Then stop it again.
Click and drag your cursor across the wave to select the part you want to keep.
14. Now click the Crop button ![]() on the main toolbar.
on the main toolbar.
We will now apply one of the Sound Forge special effects to our voice to make it sound like we are talking in a big empty space. Go to the menu bar and select Effects > Reverb:
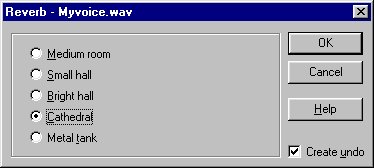
Select a reverb type of your choice. (If you don’t like the one you chose first you can always undo it and have another go, as long as you have the Create Undo checked.
15. Save your sound file as either a WAV of AIF and name it “myvoice”.
(File > Save As, then select the file type in the “Save as type” drop field.
In this exercise you have recorded and digitized analog audio, cropped or trimmed it and applied a customary digital effect.
16. Upload for assessment.
Exercise 2: Re-sampling, Fading and Mixing sound waves.
1. Open Sound forge and then open the following 3 sound files located in the Sounds\Mixing folder:
Background.wav
Thunder.wav
wind.wav
2. Also open your file from exercise 1 (Myvoice.wav)
Check out he quality of the files by selecting the file window and looking at the Status field in the bottom right hand corner of the software window.
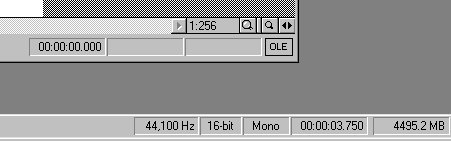
These 4 files are all of different quality excepting Wind and Thunder:
Myvoice.wav is 44.1 kHz, 16 bit, Mono.
Background.wav is 44.1 kHz, 16 bit, Stereo.
Wind.wav is 22.05 kHz, 8 bit, Mono.
Thunder.wav is 22.05 kHz, 8 bit, Mono.
Therefore to resample them all to the lowest common denominator we firstly need to change Myvoice from 44 kHz to 22 kHz and from 16 bit to 8 bit.
3. Select Myvoice and then from the menu bar select Process > Resample
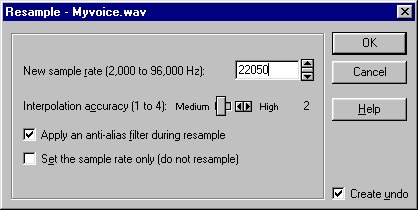
In the New Sample Rate field type in 22050. Click OK
4. Now from the menu bar again select Process > Convert to 8-Bit

The dialog here gives you 3 choices:
Truncate removes what it considers to be the least significant bits which is a fairly simplistic and undesirable choice.
Round maps the 8 bit sample to the nearest 16 bit sample which can be a bit more desirable for reducing the noise caused by the resampling process.
Dither is similar to the dithering of images in that it creates extra noise and adding a small amount of blur to disguise the noise caused by the 8 bit resampling process to the sound.
Choose Dither and give it a value of .01 (That’s the smallest distortion choice)
Have a listen to it now and see if you can notice the difference. In this process we have reduced the file size to about ¼ of the original.
5. Now do the same 2 steps with the Background wave.
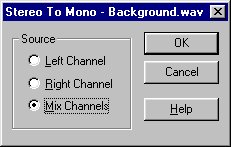
6. The last step with this file is to convert it to mono. Right click on the status field in the bottom right hand corner where it says Stereo and select Mono.
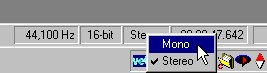
When the dialog appears choose Mix Channels.
Now all 4 files are of the same quality (22.05 kHz, 8 bit, Mono) so we can happily mix them without any problems.
7. Make sure you are viewing your files in Seconds rather than samples or anything else by selecting Options > Status Format > Seconds.
You will have to do this for every file as Sound Forge views each file with separate options.
8. Once you have done this click on Thunder.wav and select the whole wave by choosing Edit > Select All (Ctrl + A) and then copy it to the clipboard by choosing Edit > Copy. (Ctrl + C)
9. Now you are going to mix the Thunder wave which in waiting in the clipboard, into Wind.wav at exactly 9 seconds into the sound.
Click on the Wind wave and then choose Edit > Go To and type in 9 in the Position field.
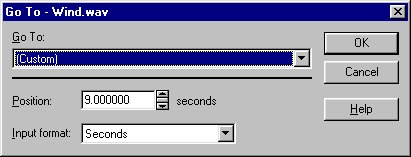
(While you’re there double check that the Input Format is seconds) The play needle should have jumped to 9 seconds, which is just over a second before the end of the sound.
10. Choose Edit > Paste Special > Mix (Ctrl + M) and in the dialog leave both the source and the destination at 100%, click OK.
Play the sound and notice how it mixed the area where there was an overlap.
11. Save the file as Mymix.wav,
12. Using the process of the last 3 steps, mix Background.wav into Mymix.wav at 3 seconds.
13. We now want to mix your Myvoice wave into Mymix but first we need to fade out an area of the right size to fit your voice in. Therefore we need to measure the length of your voice wave.
Go to Myvoice.wav and Select All (Ctrl + A) and then look at the status field within the bottom right of the sound window.
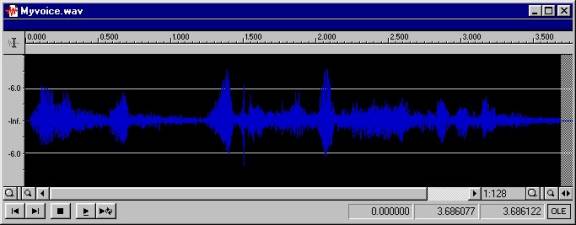 Roll your mouse over the fields and the text prompt will come up to reveal what exactly each field is. The first is Selection Left meaning the position of the left hand side of the selection.(Which is 0 at the moment) The second is Selection right which is the position of the right hand side of the selected area and the third field is the Selection Length. (Both of which are of the same value because the whole wave is selected)
Take note of the length of your selection.
Mine is about 3.7 seconds long. (Yours will be different)
14. Now we want to fade the music out for 1 second, mix the voice in and then fade back in again for 1 second. So the section will need to be 2 seconds longer than our voice file. Take note and write down the length of your wave + 2.
(For me it’s 3.7 + 2 = 5.7)
15. Copy your voice wave to the clipboard. (Ctrl + C)
16. Go to the Mymix wave and choose Edit > Selection
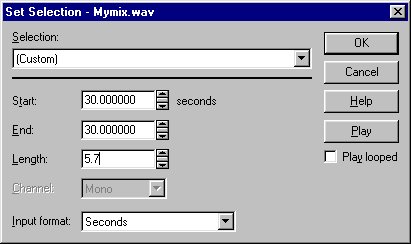
Type 30 seconds into the Start field and then your voice length + 2 in the Length field and then click OK.
17. Choose Process > Fade > Graphic and set your graphic fade to look similar to this, by clicking the line across the top to create an edit point and then drag them into position.
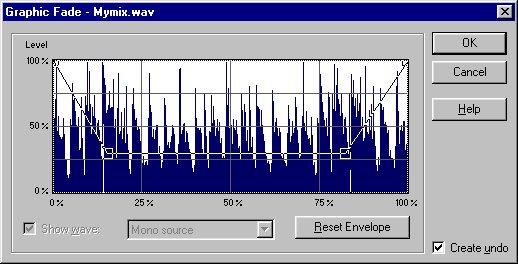
If you look at the top right hand side of the dialog box when your cursor is over the graph ou can read the percentage into the selection, the change in dB and the amount of seconds along the wave. Try to position the 2 points 1 second in from either side.
Click OK and notice that our wave has been reduced through the selection.
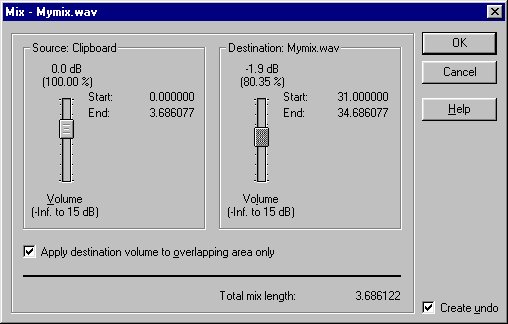
18. Now the insertion point needs to be 1 second into the selection, which is at the 31 second position. Edit > Go To [31 seconds]
19. Now with your insertion point in place choose Edit > Paste Special > Mix and this time bring the Destination volume down to about 80%.
20. Play your sound and listen to the mix. Is the voice too quiet or the background too loud. If it is undo step 19 (Edit > Undo or Ctrl + Z) and try mixing it again altering the 2 volumes accordingly.
21. All that is necessary now is to fade out the end of the music, which stops all of a sudden. Do this by selecting the last 3 seconds (Click and drag your cursor left across from the end of the wave and look in the selection length field) And then choose Process > Fade > Out. Have a listen to it. This method does make the fade a little sudden or overly direct from high to low. I would usually prefer to use a Graphic fade in this sort of situation so that you can have more control to fade the wave with more subtlety .
22. When you are happy with your mix, Save Mymix.wav and upload for assessment.
Sound loops are often used in multimedia as continuous background atmosphere. It is a sound wave that when played over and over continuously, the listener would not be able to notice where it starts and where it finishes. A sound loop is simply a wave that has been carefully cropped so that the end fits in with the beginning. Loops are also used for midi applications and mixers such as Sonic Foundry Acid and by DJs for dance mixes.
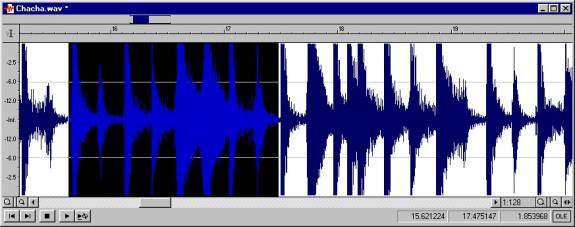
1. Open the sound Chacha.wav (In the Sounds\Looping folder) using Sound Forge XP 4.5 and have a listen to it and see if you can pick out the pattern in the rhythm. This has some fairly complicated rhythms within it but the basic pattern is reasonably easy to find.
2. Zoom in to a ratio of about 1:128 using the Zoom In ![]() button on the right hand bottom side of the wave window. (You can read the zoom ratio in the field just to the left of the Zoom buttons. This will give you a clearer view of the patterns in the sound wave.
button on the right hand bottom side of the wave window. (You can read the zoom ratio in the field just to the left of the Zoom buttons. This will give you a clearer view of the patterns in the sound wave.
3. Select an area that looks like a cycle of the pattern by clicking and dragging your cursor across the wave.
Then click the Play Looped ![]() button on the left hand bottom of the wave window. This will play your selection continuously in a looping fashion. Watch and listen to the rhythm for any hiccups or jolts as the needle travels out the end and into the start of the wave.
button on the left hand bottom of the wave window. This will play your selection continuously in a looping fashion. Watch and listen to the rhythm for any hiccups or jolts as the needle travels out the end and into the start of the wave.
4. While it is looping you can adjust the in and out points of the selection simply by rolling your cursor over the edge of the selection and when the cursor changes to a double headed horizontal arrow, you can click and drag the edge of the selection to adjust it. (Be careful not to click inside the selection or when the cursor is not a double arrow because this will de-select it)
5. Adjust either end of the wave selection until you cant hear any glitches or jumps in the rhythm. When you are reasonably happy with your loop you can Zoom right in close to either end and do a bit of fine adjustment.
I zoomed in to a ratio of 1:8 here for fine adjustment at one end and then scrolled across to do similar to the other end.

6. Copy your selection to the clipboard (Edit > Copy or Ctrl + C) make a new file, (File > New) make sure the quality is 22050 Hz, 16 bit, Stereo and paste your loop onto the new file (Edit > Paste or Ctrl + V)
7. Save your new file as Chachaloop.wav and upload for assessment.
Sound Forge XP 4.5 has some very useful tools for making loops called the ACID Loop Creation Tools.

These tools could either be on a floating palette or docked in the tool bar across the top of the program.
If you can’t find them choose View > Toolbars and check the checkbox beside the words ACID Loop Creation Tools.
The tools worth looking at here at this stage are:
· Halve Selection
· Double Selection
· Shift Selection Left
· Shift Selection Right
(Roll your mouse over each one to determine which is which) Their functions are fairly self-explanatory.
If you have got the timing right on your selection (and the music is consistent) these tools are handy for moving your selection around without changing its relationship with the tempo of the music which makes it easier to experiment with variations of your loop.
Exercise 4: More loops.
1. Listen to the other files in the Looping folder and choose one you would like to make a loop out of.
2. Using the method in Exercise 3 and also experimenting with the ACID Loop Creation Tools create 2 separate loops from the one file.
3. Name the files Loop1 and Loop2, save them as AIF format for cross platform playback on older Macs and upload for assessment.
Often recordings that aren’t performed in a professional studio contain an underlying background noise like a hiss or rumble. This is caused by many factors like computer noise, electric noise, nearby traffic, air conditioning, poor quality microphone, old tape, etc.
Prevention is much better than cure as far as recording is concerned. If you are recording take every step possible to eliminate unwanted noise. Use the right sort of microphone and take great care when setting your recording levels.
Still you will always ,for whatever reason, come across noisy recordings that need to be cleaned up a little.
It takes highly sophisticated equipment, software and expertise to re-master sound in which to remove the unwanted noise completely without losing too much of the wanted stuff. There are however, a couple of simple techniques that can reduce background noise to make the poor quality of a sound a bit less noticeable. The following exercise will take you through the basics of this technique.
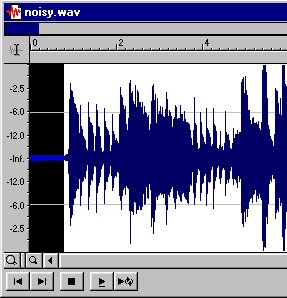
1. From within Sound Forge XP open the file Noisy.wav (In the Sounds\Noise folder) and have a listen to it. Notice the background hiss? It makes the recording pretty annoying.
2. What we need to do is find out what sort of sound frequency and amplitude make up the background hiss. The hiss is present right throughout the track so if we select a section that has no guitar playing we can analyze the hiss on its own. Click and drag your cursor across about the first .7 of a second of the clip before the guitar starts.
3. To analyze the selection choose Tools > Statistics
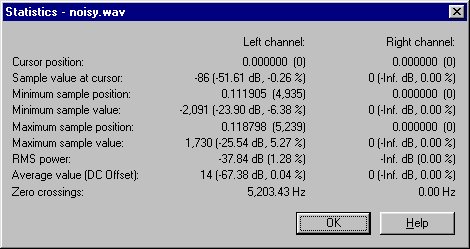
The first values we need to check here are the Minimum and Maximum sample value to see which has the greater positive or negative value. In this case it is Minimum sample value which is –6.38%. This gives us the highest amplitude of the hiss. Write down this value, we are going to need it later.
Before you close this dialog box also check the frequency of Zero crossings which is 5,203 Hz. This value is the amount of times per second the waveform crosses the base line (Changes from + to -) which gives us a rough estimate of the frequency of the hiss. Write this value down too.
Close the Statistics dialog.
4. The next step is to use the Noise Gate Effect to cut the low volume noise from within the threshold of the hiss sound. Choose Effects > Noise Gate.
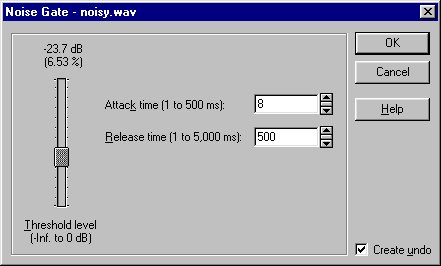
Set the Threshold slider to read just a little over the Minimum sample rate we wrote down in the last step. This will set everything below this value in amplitude to zero. Set the attack time to 8 ms which means that as soon as the volume gets abovt the threshold, the noise gate will close after 8 milliseconds. The release time is the opposite end of the higher sounds so set it to 500 ms so that none of the actual fading music gets cut off. Click OK.
5. Listen to the track and notice that now the hiss has gone from the gaps between the music but not from the music itself. We will now use the graphic equalizer to try to reduce the hiss from over the music.
6. Choose Process > Graphic EQ. If you remember what we wrote down from the statistics of the hiss we found the frequency to be about 5,203 Hz. In the Graphic Equalizer window we can reduce specific frequencies and so hopefully lose some hiss.
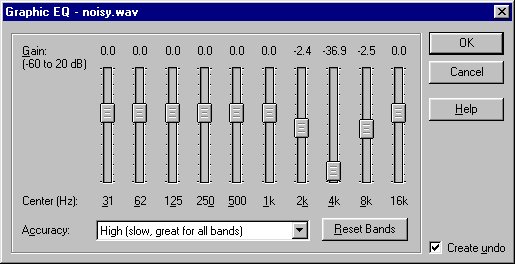
Notice I pulled down the 4K slider the most as that was the closest to our hiss frequency. I also pulled the sliders from either side down a little to compensate for any varying hiss frequencies.
7. Have another listen. The entire hiss hasn’t gone but it’s a big improvement on what it was. The professional version of Sound Forge (Not the XP express version) has other more advanced equalizing tools for tackling these sorts of problems. If you want to specialize in sound production you might want to look at what some of the more expensive software is capable of.
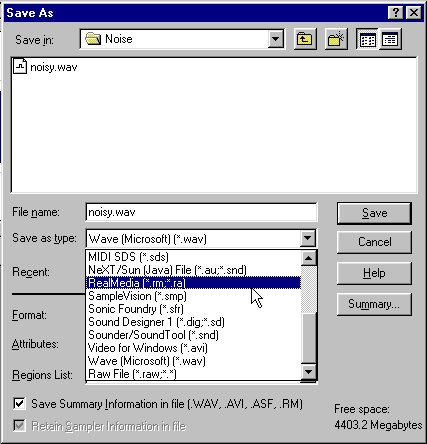
Save your work as Less_noise.aif and upload for assessment.
Multimedia developers are often required to convert digital sound into different formats for different purposes whether they be for the web, (Streaming or non-streaming) CD ROM or a specific platform. Sound forge can convert digital sound into most common formats simply by using the File > Save As feature and choosing the Save as Type drop menu.
However Sound forge is not capable of editing or converting MP3 audio. (Yet)
It also can’t deal with CD Audio format.
To edit these files you need to convert them into an editable format and then back again for the appropriate delivery. There are programs available to do this, called Encoders. Encoders are small programs dedicated to the purpose of converting audio file types without losing any quality.
There are quite a few encoders available on the Internet, some are freeware, others are shareware and professional encoders with special features are available for purchase at very reasonable prices.
A good place to find encoders is at Downloads.com (www.downloads.cnet.com) then search for encoders.
There are many different types of encoders for specific purposes and are easy to use. They may convert WAV to MP3, MP3 to WAV, Real Audio to WAV. Some encoders are designed specifically for encoding CD Audio and are known as CD Rippers. Most convert CD Audio to WAV but some, like Sonic Foundry Sonique convert CD Audio to MP3.
Download a CD Ripper from www.downloads.com that can convert CD Audio to WAV format.
Use it to convert a song to WAV at 44.1kHz 16 bit Stereo.
Then using Sound Forge re-sample the song into the following qualities, re-saving it as a different file name each time as per the table below.
Fill in the File size column and enter comments about the sound quality.
File Name |
Quality |
File size |
Quality comments |
Song44-16-S.wav |
44.1kHz, 16 bit, Stereo |
||
Song44-16-M.wav |
44.1kHz, 16 bit, Mono |
||
Song22-16-M.wav |
22.05kHz, 16 bit, Mono |
||
Song22-8-M.wav |
22.05kHz, 8 bit, Mono |
||
Song11-16-M.wav |
11.025kHz, 16 bit, Mono |
||
Song11-8-M.wav |
11.025kHz, 8 bit, Mono |
Using a word processor write a brief synopsis (300 words) demonstrating your understanding of Sample rate, Sample size and number of channels and how they each affect the file size and quality of the music.
Include the above table completed and save your document as RTF, (Rich Text Format) name it SoundSyn.rtf and upload for assessment.